Stop Getting Destroyed by Tsunamis Base Design Every Escape Tsunami Player Should Use
Main Highlights
What You'll Learn in This
- Why most Escape Tsunami bases collapse
- How water physics affect your structure
- The advantages of the A-Frame Fortress design
- Step-by-step instructions for building the strongest base
- Late-game survival tips used by experienced players
- Common mistakes that destroy otherwise solid builds
- The complete survival checklist for maximum wave resistance
Why Most Escape Tsunami Bases Fail
Before discussing the ideal layout, it's important to understand why so many structures get wiped out.
Escape Tsunami isn't just about placing blocks. The game uses physics systems that simulate the force of rushing water. Every design decision affects how your base reacts when a giant wave crashes into it.
Many players focus only on height, ignoring balance and structural support. While reaching higher ground seems logical, a tall structure without proper reinforcement becomes extremely vulnerable.
When a tsunami strikes, your base experiences several powerful forces simultaneously.
Hydrodynamic Drag
The first force is hydrodynamic drag.
This occurs when water pushes directly against the flat surfaces of your structure. Large vertical walls act like giant barriers, absorbing the full impact of the wave.
The larger the flat surface, the greater the force applied.
This is why simple box-shaped bases often get shoved backward or ripped apart.
Buoyancy and Leverage
The second major factor is buoyancy and leverage.
A top-heavy structure naturally becomes less stable. When water crashes into the lower section of a tall tower, it creates a pivot point near the base.
That force generates leverage, causing the structure to tilt, bend, and eventually collapse.
Think of it like pushing the bottom of a tree. The taller it is, the easier it becomes to knock over.
This explains why many vertical pillar builds snap apart during stronger waves.
Why Tall Towers Are a Trap
At first glance, building upward seems like the safest option.
After all, if the water can't reach you, you're safe—right?
Not exactly.
The problem is that the higher your structure becomes, the more unstable it gets. The center of gravity shifts upward, increasing the likelihood of tipping when waves strike.
Without proper support and weight distribution, height becomes a weakness rather than an advantage.
To survive late-game waves, your base must redirect and absorb force rather than simply resisting it.
That's where the A-Frame Fortress comes in.
The A-Frame Fortress
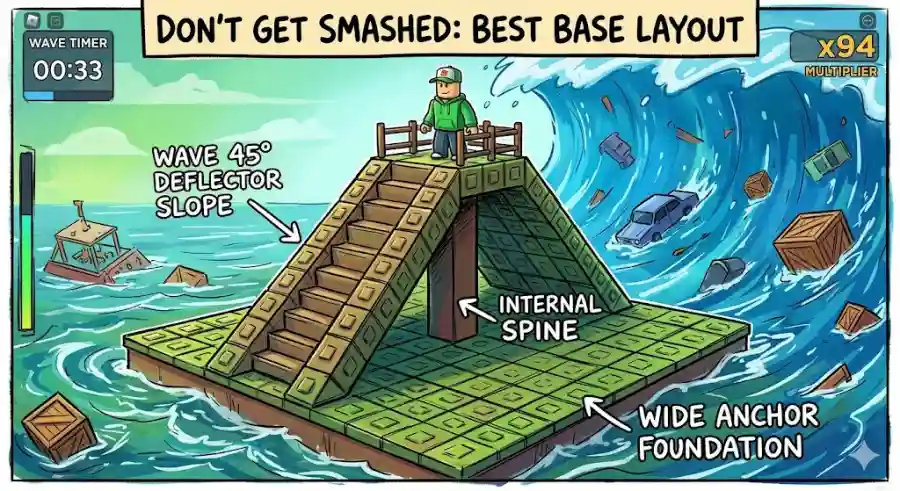
Among all tested designs, the A-Frame Fortress, also known as the Pyramid Anchor, consistently performs as one of the strongest layouts available.
Instead of fighting against the tsunami, this structure works with the game's physics.
The angled shape encourages water to flow upward and around the base rather than smashing directly into it.
Even more importantly, the design uses the weight of the incoming water to help stabilize the structure rather than topple it.
This combination of stability, durability, and efficiency makes it one of the best survival strategies currently available.
Part 1: The Foundation — Creating the Wide Anchor
Every great structure begins with a strong foundation.
One of the biggest mistakes players make is placing their main platform directly on a small patch of ground and immediately building upward.
That approach creates instability from the start.
Recommended Setup
Build a heavy, wide foundation using a square layout.
Your foundation should be at least:
- 5 × 5 blocks
- Or preferably 7 × 7 blocks
The wider the footprint, the better.
Why It Works
A large base distributes weight more evenly and lowers the overall center of gravity.
When waves hit, the force spreads across a larger area instead of concentrating on a narrow support point.
This dramatically reduces the chance of tipping.
Think of the difference between balancing on one foot versus standing with both feet planted firmly on the ground.
The wider base is naturally harder to knock over.
Part 2: The Sloped Front — The Wave Deflector
This is the most important feature of the entire build.
Many players construct vertical walls facing the ocean.
That's a huge mistake.
Recommended Setup
The side facing the incoming tsunami should feature a 45-degree slope.
You can create this using:
- Angled building pieces
- Stair-step block formations
- Gradual layered ramps
The goal is to avoid a flat wall.
Why It Works
When water collides with a vertical surface, nearly all of its force transfers directly into the structure.
However, when water strikes a slope, much of that energy gets redirected upward.
Instead of absorbing the entire impact, your base guides the wave over itself.
This significantly reduces structural stress and helps prevent the fortress from being pushed backward.
Part 3: The Reinforcement Pillar — The Structural Spine
A strong outer shell isn't enough.
Every successful A-Frame Fortress needs an internal support system.
Recommended Setup
Construct a thick central pillar directly in the middle of your foundation.
This pillar should extend from the base all the way to your final standing platform.
Avoid making it too thin.
A thicker support column provides greater durability.
Why It Works
The central spine acts as the backbone of the structure.
If floating debris damages the outer walls or sections of the slope become weakened, the internal pillar continues supporting the fortress.
Without this reinforcement, even minor damage can cause a chain reaction that leads to total collapse.
The spine keeps everything connected and stable.
Step-by-Step Guide to Building the Perfect Escape Tsunami Base
When the building timer starts, efficiency matters.
Follow this order to maximize your chances of survival.
Structure Blueprint
[ Safe Zone / Platform ]Step 1: Claim Your Ground
/ \
/ | \
/ | \ <-- Sloped Deflectors
/ | \
_________/_____|_____\_________
[ Wide Foundation ]
The moment the round begins, choose your location carefully.
Look for a spot that is:
- Slightly elevated if possible
- Free from unnecessary obstacles
- Clear of debris traps
Objects scattered around the map can become dangerous projectiles during a tsunami.
Removing junk early helps reduce future threats.
Once your location is secured, immediately begin constructing your wide foundation.
Speed is critical.
Step 2: Build the Central Spine
After completing the foundation, place your reinforcement pillar in the exact center.
Extend it upward to your intended survival height.
Important Warning
Avoid excessive height.
Many players get greedy and build far higher than necessary.
Remember:
Higher structures become less stable.
Aim for a comfortable medium elevation that clears normal wave levels without making the fortress top-heavy.
Balance is more important than altitude.
Step 3: Add the Sloped Deflectors
Now connect the top of the central pillar to the outer edges of the foundation.
Create smooth slopes along the sides facing incoming waves.
If angled blocks aren't available, use staggered stair-step layers.
Key Rule
Avoid large gaps.
Open spaces weaken the effectiveness of the deflector system and allow water to penetrate deeper into the structure.
The smoother the slope, the better the wave redirection.
Step 4: Construct the Safe Zone Platform
At the top of the central pillar, build a compact platform for your character.
This is your final survival zone.
Recommended Features
- Small standing area
- Protective railing
- Short perimeter wall
- Safety lip around the edge
These additions help prevent accidental falls caused by wind effects, collisions, or splashing water.
A small platform also keeps the structure lighter and more stable.
Pro Tips for Surviving Late-Game Waves
Building a strong base gets you most of the way there.
Winning consistently requires smart management during each round.
Here are several advanced strategies that experienced players use.
Don't Overcrowd Your Base
A common problem occurs when multiple players rush onto a single structure.
Extra avatars can create movement disruptions and make building more difficult.
Large groups also increase the chances of accidental collisions that push players off platforms.
If possible, build slightly away from highly populated spawn locations.
A little extra space often makes survival easier.
Watch Out for Debris
Not every threat comes directly from the water.
The tsunami frequently carries:
- Cars
- Crates
- Loose blocks
- Pieces of destroyed structures
These objects can slam into your fortress with surprising force.
Fortunately, the A-Frame design naturally helps deflect much of this debris.
The sloped front causes many objects to slide upward and away rather than striking critical support points.
Repair Damage Immediately
One of the biggest mistakes players make is ignoring minor structural damage.
A small hole may not seem dangerous at first.
However, every missing block changes how water interacts with the slope.
Over time, a tiny weakness can become a major failure point.
Whenever possible:
- Inspect your front slope
- Replace damaged pieces
- Reinforce weakened sections
- Maintain structural symmetry
Quick repairs often mean the difference between surviving the next wave and watching your fortress collapse.
Why the A-Frame Fortress Dominates the Current Meta
The popularity of the A-Frame Fortress isn't accidental.
It solves nearly every major challenge presented by Escape Tsunami's physics system.
Advantages Over Traditional Towers
| Feature | Traditional Tower | A-Frame Fortress |
|---|---|---|
| Stability | Low | High |
| Wave Resistance | Moderate | Excellent |
| Debris Protection | Weak | Strong |
| Weight Distribution | Poor | Excellent |
| Late-Game Survival | Inconsistent | Reliable |
While vertical towers depend heavily on luck and wave patterns, the A-Frame Fortress provides consistent protection through intelligent engineering.
That's why experienced players continue to rely on it.
Escape Tsunami Survival Checklist
Use this quick reference before every match.
| Feature | What to Do | Why It Works |
|---|---|---|
| Foundation | Build a 5 × 5 or 7 × 7 base | Lowers center of gravity and prevents tipping |
| Front Wall | Use a 45-degree slope or stair design | Redirects water upward instead of absorbing full impact |
| Center Core | Construct a thick internal spine | Maintains structural integrity if walls break |
| Top Deck | Build a small protected platform | Keeps your avatar secure from wind and splashes |
Why This Strategy Matters
As Escape Tsunami continues to grow in popularity among Roblox players, competition naturally becomes tougher.
Players are constantly experimenting with new layouts and survival methods, but the fundamentals of physics remain unchanged.
The strongest builds aren't always the tallest or most expensive.
They're the ones designed to work with the environment.
The A-Frame Fortress represents that philosophy perfectly.
Instead of resisting every force head-on, it redirects energy, distributes weight efficiently, and maintains structural stability under extreme pressure.
Those principles make it one of the most dependable designs available.