Forsaken Tier List Breakdown Discover the Strongest Survivors, Deadliest Killers, and the Shifting Meta Explained
With recent balance updates, ability tweaks, and players refining advanced mechanics, the power rankings have shifted again. Some survivors have become nearly uncatchable, while certain killers now control entire lobbies with ease.
Highlights
Before diving deep, here are the biggest takeaways from the current Forsaken ranking:
- Survivors are heavily defined by self-sustain, mobility, and chase disruption
- Killers are strongest when they can shut down loops or apply constant map pressure
- S-tier characters significantly outperform others in skilled hands
- Some B and C-tier characters still work, but require near-perfect execution
- Meta favors mechanical precision over passive gameplay
Now let’s break everything down in detail.
Forsaken Survivor Tier List: From Loop Gods to Struggle Picks
Survivor performance in Forsaken is not just about running fast. The real value comes from:
- Utility in chase situations
- Ability to stall or reset pressure
- Self-sufficiency under pressure
- Team contribution when matches collapse
S-Tier Survivors: The Meta Definers
These survivors dominate matches so heavily that killers often struggle to maintain control.
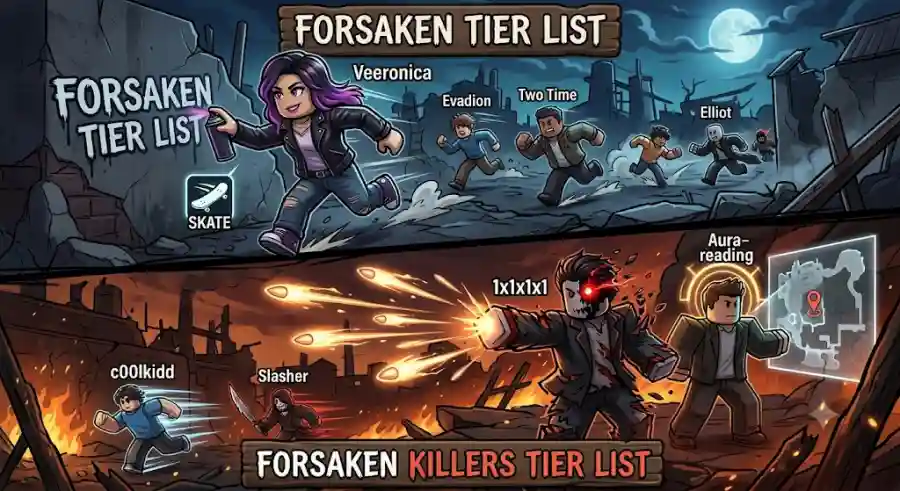
Veeronica
Veeronica is widely considered one of the strongest survivors in the entire game, often placed at the absolute top of the meta.
Her kit is extremely versatile:
- Reliable self-heal for sustainability
- Spray paint ability that obscures tracking and disrupts killer awareness
- Skate (sk8) ability providing effortless distance creation
- A powerful built-in charge that functions as an upgraded version of Guest’s mobility tools
What makes Veeronica terrifying is that she has an answer for nearly every situation. Whether it’s escaping tight loops, recovering from pressure, or extending chase time, she rarely runs out of options.
In skilled hands, she becomes extremely difficult to pin down.
Two Time
Two Time stands directly beside Veeronica at the top of the survivor hierarchy.
His strength lies in raw survivability and chase manipulation. He is extremely difficult to eliminate once he gains momentum in a match.
Key strengths include:
- High survivability under pressure
- Strong chase disruption tools
- Excellent for high-level coordinated play
At competitive levels, Two Time is a staple pick for players who want consistency and control.
A-Tier Survivors: Strong but Skill-Dependent
These survivors are powerful but require awareness, timing, or mechanical execution.
Chance
Chance is the definition of high-risk, high-reward gameplay.
- Possesses arguably the strongest stun in the game
- Long stun duration with safe execution range
- Keeps Chance out of direct danger during ability use
- Can reach up to 130 max health depending on RNG outcomes
When luck favors you, Chance becomes one of the most disruptive survivors in the lobby. However, inconsistency keeps him from S-tier dominance.
Elliot & Dusekkar
These two survivors excel because they can actively deploy abilities during chase scenarios.
Unlike older characters that require setup time or stationary execution, Elliot and Dusekkar:
- Maintain movement during ability usage
- Apply pressure while escaping
- Shift momentum mid-chase without stopping
This makes them strong, flexible picks in unpredictable matches.
B-Tier Survivors: Reliable but Outclassed
These characters are solid but struggle against stronger meta picks.
Noob
Noob is a balanced survivalist with consistent value.
- Independent gameplay style
- Slateskin ability to stall critical seconds
- Ghost burger mechanic helps break killer tracking
He performs reliably in most matches but lacks explosive carry potential.
Builderman
Builderman has strong match-saving potential but is extremely situational.
- Can construct powerful structures
- Requires approximately six seconds of stationary setup
- Vulnerable during early pressure phases from mobile killers
If interrupted early, his effectiveness drops significantly.
Shedletsky
Shedletsky provides moderate utility through his chicken ability.
However:
- His slash attack is difficult to land in fast chases
- Risk often outweighs reward in tight encounters
He remains decent but inconsistent.
C & D Tier Survivors: Highly Situational Picks
007n7
007n7 is one of the most debated survivors in the game.
- Weak in standard pathfinding gameplay
- Clones are easily recognized by experienced killers
- Very low team utility
However, advanced mechanics can elevate him:
- Clone parrying
- Hitbox dragging
- Strategic invisibility timing for corner escapes
When mastered, he becomes significantly stronger—but only in expert hands.
Guest 1337
Guest 1337 is inconsistent in competitive play.
- Block mechanic works against some melee abilities
- Unreliable against standard M1 attacks
- Can survive if played purely defensively
Still, he is easily punished by coordinated killers.
Forsaken Killer Tier List: The Lobby Shredders
Killers in Forsaken are judged by two main factors:
- Ability to break loops quickly
- Map pressure and survivor tracking efficiency
Killer Overview (Meta Breakdown)
- S-Tier: 1x1x1x1, John Doe
- A-Tier: c00lkidd
- B-Tier: Slasher
- C-Tier: Noli
- D-Tier: Jason
S-Tier Killers: Absolute Dominators
1x1x1x1
One of the most oppressive killers in the current meta.
Strengths:
- Insane projectile pressure
- Very short cooldowns after recent buffs
- Extremely easy to apply pressure once predictions land
- Forces survivors out of safe healing zones
Once mastered, 1x1x1x1 can control entire lobbies with constant threat presence.
John Doe
John Doe remains one of the strongest tracking-focused killers.
- Extreme map pressure
- Punishes survivor mistakes instantly
- Strong chase conversion ability
His weakness appears only when survivors coordinate split pressure effectively.
A-Tier Killers: High Punish Potential
c00lkidd
c00lkidd thrives on punishing mistakes instantly.
- Walkspeed override allows rapid gap closing
- Extremely punishing if survivors misstep
- High reward for precision gameplay
However, missed abilities lead to long cooldown punish windows.
???? B & C Tier Killers: Effort-Heavy Performance
Slasher
Slasher is a balanced, straightforward killer.
- Strong anti-bodyblock mechanics
- Counters clone-heavy survivors like 007n7
- Lacks global pressure compared to top-tier killers
Reliable but not oppressive.
Noli
Noli appears strong on paper due to massive durability.
- Very high HP pool (1111 HP)
- Strong presence in fights
But in reality:
- Poor stamina management
- Easily kited in structured loops
- High effort for low reward
D-Tier Killer: The Weakest in Meta
Jason
Jason struggles heavily in modern gameplay.
- No ranged abilities
- No tracking tools
- Easily looped by experienced survivors
Against coordinated teams, Jason becomes one of the least effective killers in the roster.
Wrap-Up: Who Should You Main in Forsaken?
The current Forsaken meta strongly rewards precision, awareness, and adaptability.
If you prefer survivors:
- Veeronica offers the highest consistency and escape potential
- Two Time provides unmatched survivability and control
If you prefer killers:
- 1x1x1x1 dominates with overwhelming pressure and versatility
- John Doe excels in tracking and punishing mistakes
Ultimately, Forsaken is not just about picking strong characters—it’s about mastering them under pressure. Even lower-tier characters can perform well in skilled hands, but the gap between tiers becomes very noticeable at higher levels of play.
The meta will continue to evolve, but for now, these rankings define the current battlefield.