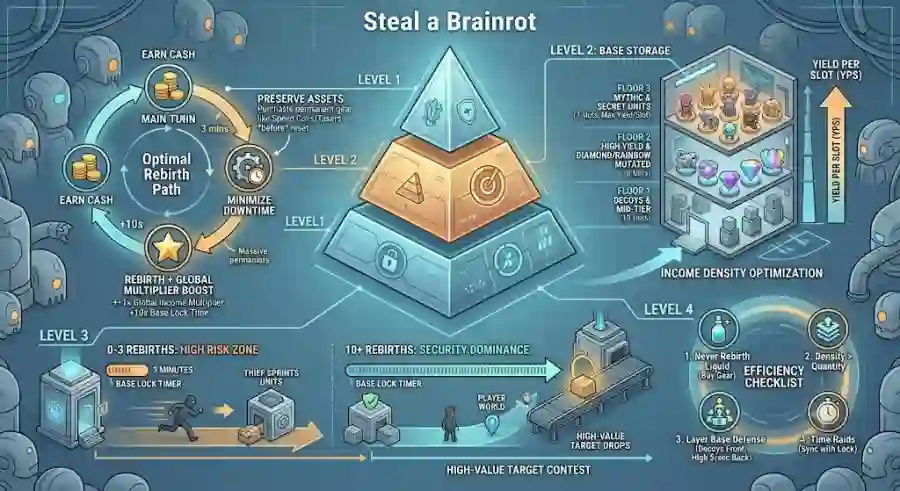
How to Time Rebirths, Maximize Brainrot Income, Secure Your Base and Build a Faster-Scaling Economy in Roblox
Top players can look at the game through three connected measurements: cash-per-second (CPS) velocity, base footprint efficiency, and rebirth timing. Instead of simply chasing the most expensive Brainrots, efficient players focus on how quickly every part of their setup contributes to future growth.
Highlights
Before getting into the deeper calculations, here are the most important economic principles to understand:
- Rebirthing wipes your active cash.
- Every Brainrot currently inside your base is also cleared when you rebirth.
- Each rebirth provides a permanent +1× Global Income Multiplier.
- Every rebirth also adds +10 seconds to Base Lock Duration.
- Certain rebirth milestones unlock additional base floors.
- The base starts with 10 Brainrot slots across Floors 1.
- Rebirth 2 unlocks Floor 2 and raises capacity toward 18 Brainrots.
- Rebirth 10 unlocks Floor 3 and brings maximum storage to 27 Brainrots.
- The best rebirth timing depends on post-rebirth recovery speed, not simply reaching the required cash amount.
- High-value utility gear purchased before rebirthing remains available afterward because items do not reset.
- Yield Per Slot (YPS) is more useful than raw Brainrot value when optimizing a full base.
- Defensive positioning can determine whether your highest-income Brainrots survive a raid.
- Higher rebirth counts eventually provide substantially longer base-lock windows.
The central idea is simple: short-term income matters, but long-term scaling matters more.
The Rebirth Equation: Reset Now or Keep Holding?
Rebirth is one of the most important decisions in Steal a Brainrot because it forces you to sacrifice your current setup in exchange for permanent advantages.
When you rebirth, your active cash disappears. Every Brainrot sitting inside your base is also cleared.
That sounds like a huge loss, and in the short term, it is.
However, the reset comes with two permanent benefits that can dramatically improve your future progression.
1. +1× Global Income Multiplier
Every rebirth provides a +1× Global Income Multiplier.
This means your future cash generation becomes stronger as your rebirth count increases. Instead of thinking about rebirth as simply losing your current progress, it is better to view it as converting temporary assets into permanent account growth.
The more efficiently you handle the recovery period after each reset, the more valuable this multiplier becomes.
2. +10 Seconds of Base Lock Duration
Every rebirth also adds +10 seconds to your Base Lock Duration.
That security increase can become just as important as the income boost.
A stronger economy is not very useful if other players can repeatedly enter your base and extract your best Brainrots. More lock time gives you a larger defensive window and greater freedom to leave your base.
Base Floors and Storage Milestones
Rebirths also affect the physical capacity of your base.
The progression works as follows:
- Base State — 0–1 Rebirths: Floor 1 can hold up to 10 Brainrots.
- Rebirth 2: Unlocks Floor 2, increasing total capacity toward 18 Brainrots.
- Rebirth 10: Unlocks Floor 3, bringing maximum base storage to 27 Brainrots.
These additional floors are important because they increase the number of income-producing units you can maintain.
However, more slots do not automatically mean a better economy.
Once your base reaches the maximum 27-slot capacity, the question changes from “How many Brainrots can I store?” to “Which Brainrots deserve those slots?”
That is where income density becomes critical.
Finding the Optimal Rebirth Threshold
One of the biggest mistakes beginners make is rebirthing immediately after reaching the required cash amount.
Technically, they can rebirth.
Economically, that does not always mean they should.
The moment you reset, your active CPS drops to zero because your previous income-producing setup has disappeared. You then need to rebuild your starter setup before your economy starts operating at full speed again.
If that recovery takes too long, you can lose valuable momentum.
A better way to judge the decision is through the Recovery Rate Formula:
$$
\text{Recovery Time} =
\frac{\text{Rebirth Cost} + \text{Starter Unit Re-acquisition Cost}}
{\text{Post-Rebirth Target CPS}}
$$
This formula focuses on the time required to rebuild your economy after the reset.
The lower the recovery time, the more attractive the rebirth becomes.
The Rule of 3x
A useful benchmark is the Rule of 3x.
You should only execute a rebirth when your expected post-rebirth CPS allows you to recover the cost of your starter setup in less than 3 minutes.
This creates a simple decision-making framework.
If your new setup can recover its required investment quickly, the permanent rebirth benefits can start working in your favor sooner.
If recovery takes much longer, resetting too early may leave you stuck with a weak economy while other players continue producing cash.
This is why experienced players do not treat the rebirth button as an automatic upgrade.
They treat it as an investment decision.
The Stockpiling Strategy: Turn Cash Into Permanent Value
There is another important part of rebirth optimization that can easily be overlooked.
Before rebirthing, consider converting excess liquid cash into high-value utility equipment from the Coins Shop.
Examples include Speed Coils and defensive gear.
Why?
Because items do not reset upon rebirthing.
That makes certain purchases a form of permanent value preservation.
Instead of allowing all your cash to disappear during the reset, you can transform some of that temporary wealth into equipment that survives the rebirth.
This can give you a much stronger starting position after the reset.
The strategy is especially useful when you already have enough cash to satisfy the rebirth requirement and still have additional funds available for equipment.
The basic idea is:
Temporary cash → Permanent equipment → Faster post-rebirth recovery
That is an important distinction because your goal is not simply to spend everything before rebirthing. The goal is to convert surplus resources into assets that continue helping you afterward.
Base Floor Economics: Why Every Slot Matters
At high rebirth levels, your base eventually reaches a maximum capacity of 27 Brainrots.
That means base management becomes an exercise in income density optimization.
Every slot has an opportunity cost.
If you use one slot for a low-yield unit, you are not just gaining the income from that unit. You are also giving up the opportunity to use that same slot for something potentially more productive.
This is why experienced players should evaluate Brainrots based on their actual contribution to the economy rather than simply looking at their purchase price or rarity.
A useful measurement is Yield Per Slot (YPS).
The formula is:
$$
\text{YPS} =
\text{Base CPS}
\times
\text{Mutation Multiplier}
\times
\text{Rebirth Multiplier}
$$
This calculation provides a better picture of the income efficiency of each occupied space.
A rare Brainrot is not automatically the best choice if another unit generates more effective CPS for the same amount of base space.
Recommended 27-Slot Floor Strategy
Once you reach the full three-floor configuration, the base can be organized according to both income potential and defensive value.
The suggested distribution is:
[Floor 3 - Top Floor]  --> 7 Slots
Reserved for Mythic / Secret Units

[Floor 2 - Mid Floor]  --> 8 Slots
High $/sec + Diamond/Rainbow Mutated Units

[Floor 1 - Main Floor] --> 10 Slots
Decoy Units near Shield / Base Lock Button
This layout is not simply about making the base look organized.
It combines economic efficiency with defensive positioning.
The strongest units are pushed deeper into the base, while lower-risk or decoy units occupy the more accessible areas.
That means an attacker who gets inside may waste valuable time reaching a unit that is not your most important producer.
Why Spatial Layout Dictates Income Security
In Steal a Brainrot, your base layout can directly influence whether your income survives a raid.
When your base lock timer expires, thieves can sprint toward the closest visible entity.
That creates an important defensive principle:
The first Brainrot an enemy sees does not have to be your most valuable Brainrot.
Instead, you can deliberately use your base structure to control the risk.
Floor 1: The Entrance Zone
Floor 1 is the first area an intruder is likely to reach.
For that reason, it makes sense to place mid-tier or bright decoy units in this area.
The idea is straightforward.
If a thief enters your base and immediately sees an accessible unit, they may grab it and attempt to escape. That action can trigger your server alert while your strongest producers remain deeper inside the base.
This creates a form of defensive misdirection.
You are effectively sacrificing accessibility for protection.
The first layer does not necessarily need to contain your best income-producing assets. Instead, it can function as a buffer between your valuable Brainrots and an invading player.
Floors 2 and 3: Protect the Inner Sanctum
The deeper floors should be reserved for your most important assets.
That means placing high-tier Mythics, Secrets, and Lava/Rainbow mutated units in the more protected areas of the base.
The reason is not only rarity.
These units can represent a significant portion of your income generation, making their protection economically important.
Forcing an intruder to travel through staircases or ladders also increases their exposure time.
That extra movement can give defenders more opportunities to react.
It also gives traps and counter-attacks more time to become relevant.
The result is a base that does more than store Brainrots.
It creates layers of risk for anyone attempting to steal from it.
The Defensive Math: Lock Time vs. Extraction Risk
Base security is fundamentally a timing game.
Your laser lock provides a temporary defensive window that lets you organize your inventory, manage your setup, or purchase conveyor spawns without constantly exposing your base.
The default lock duration provides only a limited amount of breathing room.
Rebirth changes that equation.
Every rebirth adds another +10 seconds to the lock timer.
The total can be represented with this formula:
\text{Default Duration}
+
(\text{Rebirth Count} \times 10\text{s})
$$
This is where the long-term defensive value of rebirth becomes clear.
A player with more rebirths is not simply generating more income. They also have a larger security window in which to operate around the map.
Strategic Security Thresholds
Different rebirth ranges create very different strategic conditions.
0–3 Rebirths: High-Risk Phase
Players with 0–3 rebirths have relatively short lock times.
At this stage, leaving the base can be dangerous.
For example, traveling to the central conveyor to purchase items can create an opening for another player to attack your base.
Because your defensive window is limited, your movement strategy should remain conservative.
Focus on short, rapid sweeps outside the base rather than extended trips.
It is also important to rely on traps positioned around your lock button.
At low rebirth levels, your base security depends heavily on how quickly you can return and how effectively you can punish an attempted raid.
10+ Rebirths: Security Dominance
The situation changes significantly once you reach 10+ rebirths.
At that point, you have gained more than 100 seconds of additional lock time from rebirths alone.
That creates a much larger operating window.
Instead of being forced to remain close to your base, you can spend more time moving around the map.
This allows you to:
- Move across the map more confidently.
- Contest high-value conveyor drops.
- Purchase valuable items.
- Execute raids on enemy bases.
- Leave your main income-producing setup protected during active lock cycles.
This is why rebirth progression eventually becomes both an economic and defensive advantage.
The income multiplier increases your earning potential, while the additional lock duration gives you more freedom to use that economy aggressively.
The Bigger Picture: Economy and Defense Work Together
The most interesting part of rebirth optimization is that the game's economic and defensive systems are closely connected.
A stronger CPS means you can recover faster.
Faster recovery makes rebirthing more attractive.
More rebirths increase your income multiplier.
Those same rebirths also increase your base-lock duration.
A longer lock duration makes it safer to leave your base.
Greater freedom lets you pursue better conveyor drops and raid opportunities.
Better assets then improve your overall income density.
The systems continuously feed into one another.
This creates a progression loop:
Rebirth → Higher multiplier → Faster CPS → Better recovery → Stronger base → Better security → More freedom → Greater economic growth
That is the core of long-term scaling in Steal a Brainrot.
Why Raw Brainrot Value Is Not Enough
One of the biggest strategic lessons is that the most expensive Brainrot is not automatically the best economic choice.
Your base has a limited number of slots.
At the maximum configuration, you only have 27 spaces.
That means each space must be evaluated based on what it contributes to your overall income.
A unit with strong base CPS and a powerful mutation multiplier can outperform a more expensive unit if it provides better effective income for the space it occupies.
This is exactly why Yield Per Slot matters.
Instead of asking:
“How valuable is this Brainrot?”
A more useful question is:
“How much income does this Brainrot generate compared with the slot it occupies?”
That change in thinking can significantly improve base efficiency.
Industry-Style Analysis: Think Like an Economy Builder
Although Steal a Brainrot is designed around fast-paced Roblox gameplay, its progression system rewards many of the same ideas used in economy-based games.
You are balancing:
- Liquidity: How much active cash you currently have.
- Permanent assets: Equipment that survives rebirth.
- Income velocity: How quickly your CPS generates new cash.
- Capacity: How many Brainrots your base can hold.
- Efficiency: How much income each slot produces.
- Risk: How vulnerable your assets are to theft.
- Security: How much time your lock provides.
- Scaling: How much stronger your economy becomes after each rebirth.
The strongest strategy therefore is not simply to maximize one statistic.
A player with huge CPS but weak security may lose valuable assets.
A player with excellent defense but poor income density may struggle to scale.
And a player who constantly rebirths without calculating recovery time can repeatedly destroy their own momentum.
The goal is balance.
Why Rebirth Timing Matters More as You Progress
Early in the game, the temptation is to think of rebirth as a milestone.
You reach the required amount of cash, press the button, and move forward.
As your account develops, that approach becomes less efficient.
The more valuable your current setup becomes, the greater the opportunity cost of wiping it.
That makes recovery calculations increasingly important.
You should consider:
- Your rebirth cost.
- The cost of rebuilding your starter units.
- Your expected post-rebirth CPS.
- How quickly you can recover.
- Whether you can preserve value through permanent equipment.
- How much additional security the rebirth provides.
- Whether your new floor capacity will meaningfully improve your income.
The correct rebirth is therefore not necessarily the earliest possible rebirth.
It is the rebirth that produces the strongest overall improvement in your future progression rate.
The economy of Steal a Brainrot becomes much easier to understand once you stop viewing rebirths, Brainrots, storage, and base security as separate systems.
They are parts of one connected progression engine.
Rebirthing sacrifices your current cash and clears the Brainrots inside your base, but it gives you a permanent +1× Global Income Multiplier and +10 seconds of Base Lock Duration. Rebirth milestones also unlock additional storage, with Rebirth 2 opening Floor 2 and increasing capacity toward 18 Brainrots, while Rebirth 10 unlocks Floor 3 and raises maximum storage to 27 Brainrots.
The most important decision is knowing when to reset.
Use the Recovery Time Formula to judge whether your post-rebirth economy can rebuild quickly, and follow the Rule of 3x by targeting a starter setup recovery time of less than 3 minutes.
Before resetting, consider the Stockpiling Strategy as well. Since items such as Speed Coils and defensive gear purchased from the Coins Shop do not reset, converting excess liquid cash into permanent equipment can make your next economic cycle much stronger.
Once your base reaches 27 slots, shift your focus toward Yield Per Slot rather than raw Brainrot value. Reserve the upper floors for Mythic, Secret, Lava, and Rainbow mutated units, while using Floor 1 for mid-tier or decoy Brainrots near the shield and base-lock button.
Finally, never underestimate security.
At 0–3 rebirths, your short lock window forces you to make quick trips and stay close to home. At 10+ rebirths, more than 100 seconds of additional lock time can fundamentally change how you play, giving you enough freedom to cross the map, compete for valuable conveyor drops, and raid enemy bases while keeping your own income protected.
The biggest lesson is simple: Steal a Brainrot rewards players who think beyond the next Brainrot.
When you combine CPS velocity, rebirth timing, YPS efficiency, permanent equipment, base-floor organization, and defensive timing, your progression becomes more deliberate and far more scalable.
The strongest economy is not necessarily the one producing the most cash right now.
It is the one that can recover faster, protect more value, and become stronger after every reset.