Master Campfire Mechanics, Build Unbreakable Bases and Conquer Every Difficulty Spike in 99 Nights in the Forest
A neglected fire can leave you freezing in the darkness or vulnerable to nocturnal hunters. A poorly planned base can collapse under the pressure of a single siege. Success comes from mastering efficiency, understanding enemy behavior, and building structures that work with the game's mechanics rather than against them.
Highlights
Key S urvival Takeaways
- Campfires serve as your primary source of warmth, cooking, protection, and sanity management.
- Fuel selection becomes increasingly important as nights become longer and more dangerous.
- Fire pit upgrades dramatically improve efficiency and weather resistance.
- Base layouts should focus on controlling enemy movement rather than simply creating thicker walls.
- Night 30, Night 60, and Night 90 introduce major survival challenges that require advance preparation.
- The Donut Kill-Box remains one of the strongest solo-player defensive designs.
- Vertical building strategies become essential after Night 60.
- Consistent resource management often matters more than massive base expansion.
Part 1: Mastering Core Campfire Mechanics
Why Your Campfire Is the Most Important Structure in the Game
Many new players make the mistake of treating the campfire as a decorative utility. In reality, it functions as the beating heart of your entire survival operation.
Your campfire is responsible for:
- Maintaining body warmth
- Cooking food
- Deterring specific predators
- Supporting your sanity meter
- Providing visibility during nighttime
- Helping you survive weather events
Without a functioning fire, even a heavily fortified base can quickly become a death trap.
The difference between surviving Night 99 and losing everything often comes down to how effectively you manage fuel and heat.
Understanding Fuel Efficiency and Burn Tiers
Not every piece of fuel delivers equal value. Choosing the right materials dramatically impacts long-term survival.
Tier 1: Twigs and Leaves (Flash Burns)
Twigs and leaves represent the most basic fuel source available.
Their advantages include:
- Easy to collect
- Excellent for starting fires
- Useful for emergency heating
- Effective for removing the "Drenched" debuff
However, their usefulness ends there.
They burn extremely quickly and disappear within minutes. Depending on them overnight is one of the most common mistakes beginners make.
Use them for temporary heat, but never as your primary nighttime fuel source.
Tier 2: Softwood Logs (Pine and Fir)
Softwood logs become the backbone of mid-game survival.
Benefits include:
- Reasonable burn duration
- Good heat production
- Widely available
- Efficient gathering rates
Most players spend a significant portion of their playthrough relying on pine and fir logs because they offer a balanced combination of accessibility and effectiveness.
While reliable, they eventually become less efficient during the harsher late-game seasons.
Tier 3: Hardwood Logs (Oak and Birch)
Hardwood is where serious survival begins.
Although oak and birch trees require more effort to harvest, the investment pays substantial dividends.
Hardwood logs:
- Burn approximately twice as long as softwood
- Generate significantly higher heat
- Improve overnight survival
- Reduce fuel consumption over time
As Night 60 approaches, hardwood should become your standard fuel source.
Veteran players typically stockpile massive quantities well before winter conditions arrive.
Tier 4: Charcoal and Coal
At the top of the fuel hierarchy sit charcoal and coal.
These resources can either be discovered in deep cave systems or manufactured using a Kiln.
Their advantages are substantial:
- Extremely slow burn rate
- Exceptional efficiency
- Minimal maintenance requirements
- Reliable overnight operation
Charcoal and coal essentially automate a large portion of your heating needs. Instead of constantly waking up to refuel, you can sleep through the night without worrying about freezing temperatures.
For long-term survival runs, these fuels are indispensable.
Heat Radius and Insulation Mechanics
Finding the Perfect Distance
The game uses a dynamic heat radius system that requires careful positioning.
Standing too close to your fire isn't always beneficial.
If you remain near the flames for too long, you'll receive the "Singed" debuff, which damages clothing durability and increases equipment wear.
Move too far away, and your character risks freezing.
Finding the optimal balance is essential.
Using Natural Insulation to Your Advantage
One of the most overlooked mechanics in the game involves environmental insulation.
A campfire exposed to open terrain performs significantly worse than one protected by natural structures.
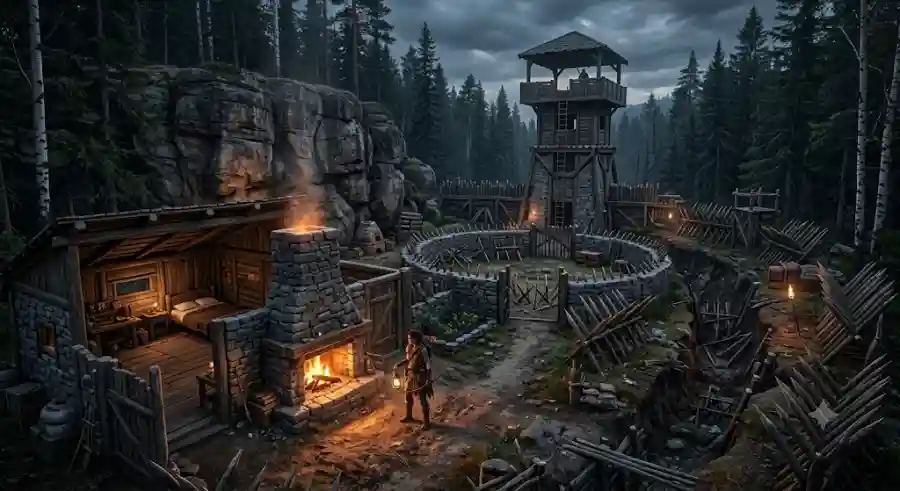
Professional Survival Tip: Always place your fire pit against a stone wall or inside a sheltered structure.
The game features dynamic wind systems. Strong northern gales can:
- Reduce heat output by 50%
- Double fuel consumption
- Make nighttime survival dramatically harder
A protected fire operates far more efficiently and conserves valuable resources.
Upgrading Your Fire Pit
The basic dirt-and-stick campfire should only be considered a temporary solution.
As resources become available, upgrading should become a top priority.
Stone Ring Pit
The Stone Ring Pit provides your first meaningful efficiency improvement.
Benefits include:
- 15% lower fuel consumption
- Protection from light rainfall
- Better heat retention
This upgrade offers excellent value early in the game and should be acquired as soon as possible.
The Hearth (Brick and Clay)
The Hearth represents a major leap forward.
Instead of wasting heat energy, it directs warmth more efficiently throughout enclosed spaces.
Its primary advantage is its ability to heat an entire 3x3 room effectively.
This dramatically improves comfort, fuel efficiency, and indoor survival.
The Charcoal Stove
The Charcoal Stove is widely regarded as a mandatory upgrade for late-game progression.
Its advantages include:
- Complete weather immunity
- Superior heating performance
- Reliable operation during winter storms
- Reduced maintenance requirements
By the time Night 60 arrives, players who haven't upgraded to a Charcoal Stove often find themselves struggling to survive.
Part 2: High-Survival Base Layouts
Why Base Design Matters More Than Wall Strength
A common misconception among new players is that survival simply requires building thicker walls.
In reality, intelligent design beats brute force.
Enemy AI becomes increasingly sophisticated over time. Attackers learn to identify weak points, navigate around obstacles, and coordinate assaults.
Your goal isn't merely to stop enemies.
It's to control where they go.
The following layouts have been extensively tested and remain among the most reliable strategies for reaching Night 99.
Layout 1: The Donut Kill-Box (Best for Solo Players)
Concept Overview
The Donut Kill-Box revolves around one fundamental principle:
Force enemies into predictable movement patterns.
Structure
Outer Spike Wall
        ↓
    Deep Trench
        ↓
  Donut Loop Path
        ↓
     Inner Keep
Core Construction
At the center, build a fortified 2x2 stone room known as the Inner Keep.
This room houses:
- Your Hearth
- Your Bed
- Emergency supplies
Building the Outer Ring
Construct a circular wall around the keep.
Leave only a single entrance gap.
This opening becomes the focal point of your defense.
Creating the Trap Corridor
Fill the gap with:
- Punji sticks
- Spring traps
- Additional defensive hazards
Because enemy AI naturally follows the path of least resistance, attackers ignore the stronger walls and funnel directly into your trap zone.
Why It Works
The true strength of this design comes from elevated combat positioning.
From the roof of the Inner Keep, you can safely rain arrows onto trapped enemies while avoiding direct damage.
For solo players, few layouts offer a better balance of safety and efficiency.
Layout 2: The Cliffside Citadel (Best for Resource Efficiency)
Let Nature Build for You
Constructing defensive walls requires enormous resource investment.
The Cliffside Citadel reduces those costs by using natural terrain.
Find either:
- A large mountain cliff
- A deep ravine
- An indestructible rock face
These structures effectively provide free defensive coverage.
Base Configuration
Position your entire base directly against the cliff.
This eliminates attacks from one direction entirely.
The V-Shaped Funnel
Extend walls outward from the cliff in a V formation.
The narrow end points toward your base while the open end faces the forest.
This forces enemies to:
- Split their forces
- Crowd into bottlenecks
- Move through predictable routes
Campfire Placement Strategy
Place your Hearth directly against the cliff wall.
The surrounding stone acts as natural insulation, reflecting warmth back into the base.
The result is lower fuel consumption and improved temperature management.
Layout 3: The Modular Watchtower (Night 60+ Survival)
Why Verticality Becomes Essential
Once Night 60 arrives, new enemy types begin appearing.
These include:
- Heavy brutes
- Advanced siege attackers
- Ranged enemies
Ground-level structures become increasingly vulnerable.
Elevation becomes a necessity.
First Floor: The Decoy Layer
Construct the bottom level using heavy stone pillars.
Keep it largely empty.
Add:
- Spikes
- Barricades
- Defensive obstacles
Enemy AI will waste valuable time attacking these structures while you remain safely above.
Second Floor: Living Quarters
This becomes your operational center.
Include:
- Storage chests
- Crafting stations
- Beds
- Upgraded stove systems
Access should be limited to a rope ladder that can be pulled up during nighttime.
This dramatically increases security.
Rooftop Overlook
The roof serves as your observation and defense platform.
Features include:
- Flat construction
- Half-wall cover
- 360-degree visibility
This vantage point allows you to detect incoming threats long before they reach your perimeter.
Part 3: Surviving the Major Difficulty Spikes
Night 30: The Blood Moon Storm
The Threat
Night 30 introduces one of the game's most dangerous weather events.
Players face:
- Continuous heavy rain
- Instant campfire extinguishing
- Aggressive canine pack attacks
An exposed fire will not survive.
How to Prepare
Before Night 29 arrives:
- Build a roof over your fire pit
- Store at least 20 Hardwood Logs
- Repair defensive walls
- Cook food in advance
Right before darkness falls, consume cooked meat to maximize stamina reserves.
Expect to spend much of the night actively repairing damage.
Night 60: The Deep Freeze
The Threat
This milestone marks the arrival of true winter conditions.
Temperatures plunge below freezing levels.
Remaining outside for longer than 30 seconds can trigger frostbite.
The worst part?
Frostbite permanently reduces maximum health until treated.
How to Survive
Several preparations are mandatory:
- Upgrade to a Charcoal Stove
- Build enclosed stone housing
- Relocate crafting stations indoors
- Stockpile heating resources
When defending exterior walls, carry a portable torch.
Although it provides limited warmth, it prevents immediate freezing.
Night 90 and Beyond: Endgame Sieges
The Threat
The final phase introduces armored giants capable of destroying wooden defenses with frightening efficiency.
Some can smash through walls in just two hits.
Traditional defenses quickly become obsolete.
Endgame Preparation Checklist
Before reaching Night 90:
- Upgrade to Tier 3 Stone structures
- Reinforce key areas with Ironwood
- Expand trap networks
- Improve resource stockpiles
Most importantly, resist the temptation to fight giants directly.
Your base should do most of the work.
The Donut Kill-Box remains particularly effective because it combines trap damage, pathfinding manipulation, and fall damage to eliminate threats before they reach critical structures.
Industry Analysis: Why 99 Nights in the Forest Stands Out
Modern survival games often focus heavily on crafting and exploration, but 99 Nights in the Forest places unusual emphasis on systems interaction.
Players must balance:
- Resource management
- Environmental hazards
- Weather mechanics
- Heat efficiency
- Defensive architecture
- AI pathfinding
This layered design creates a survival experience where preparation matters more than combat skill.
The game's increasing difficulty curve rewards strategic planning while punishing careless expansion.
That balance is one of the reasons survival-focused players continue to praise the title.
Why These Strategies Matter
Many survival runs fail because players focus on aesthetics instead of efficiency.
Large castles may look impressive, but they often require excessive maintenance and consume valuable resources.
The most successful players prioritize:
- Fuel efficiency
- Defensive funnels
- Heat management
- Resource conservation
- Controlled enemy movement
Every decision should support long-term survival.
When resources become scarce and enemies become stronger, efficiency always wins.